By Sharon

Thursday 20 August 2015

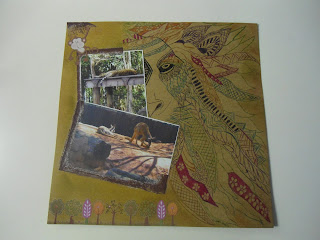
Lion Heart

So I had a little play trying to improve my Zentangle skills. I googled some Zentangle images and just loved the look of this lion, so decided to give it a try. While the idea of the image was found on google, I did change it to mostly my own doodling.

The pics were taken at Dreamworld, and I have added some rubons as the part frame around the pics, trees and the cute monkey.

Thanks for dropping by, Sharon

Tuesday 18 August 2015

Born to Ride

Hi there well today I am sharing a layout for the Mood board challenge over at http://scrapafrica.blogspot.com.au/

These colours were just perfect for a chipboard dump truck I had in my stash, so I painted it yellow, orange, black for the wheels and added some smooch for the silver (chrome areas). I placed a pic of Billy pushing a toy dump truck on top of the dump truck as if he was the load.

I used a brick work stencil with some modelling paste on my page, then when dry I used some Tim Holtz distress ink – mustard seed, and spiced marmalade to lightly colours the bricks. I mounted this onto some blue, then some green bazzill papers.

For something a little different as the photo mat I made my own coloured sheet using some colours from the mood board, first was some white acrylic paint, then using mister bottles with colours mixed with water, orange, yellow and blue I sprayed randomly over the page.

Once this page was dry I cut it into strips which I then plaited to use as the photo mat. To finish the layout I added some cogs, and a couple of tags, one with some journaling on which tucks underneath the photo mat.

I didn’t want to add anything else to the layout, I wanted to keep it fairly simple. The photos of Billy have been sitting in my photo box for a long time waiting to get scrapped so I am happy I finally got around to using them. Thanks for dropping by, Sharon xxx

Monday 17 August 2015

Me & my boys

Hi there sharing this layout, I am just loving the pastel colours. Using a white and chewing gum paint dabber – I started working on the base colours. Then out came the stencils and some glimmer mist –latte and the base is almost ready.

Using a gel pen and a stencil I have drawn on some shapes, and also cut the same shapes from some beautiful paper I had in the stash. A couple of vellum quotes and a lovely frame and then to finish the layout I added a paper flower and tried something a little different for the centre, I added some glass beads from my stash.

Thanks for dropping by, Sharon xxx

Friends Forever

Hi there today I am sharing a layout I did for https://www.facebook.com/pages/Creative-Scrapbook-Supplies

I used a Paint Dabber- white to prepare my background ready for the blue and black acrylic paints I mixed in mister bottles with water. I am liking the effect of the paints. The big shot got a real work out for this layout, including the photo mat which I used some foil tape and an embossing folder with the big shot.

Adding a chipboard flower, and a couple of pearls and the layout is complete. This is my favourite photo of my boys. Thanks for dropping by, Sharon xxx

Friday 14 August 2015

Love

Well I finished another layout this afternoon, this is for the mood board/sketch challenge over at http://offtherailsscrapbooking.blogspot.com.au

Loving the colours of this mood board made it an easy layout and I had these pics I have wanted to scrap for a little while. I am loving my gesso of late so guess what, out came the gesso again. Then using Blue, yellow, black acrylic I mixed with water in separate mist bottles.

Spraying on some paper to give the colours I wanted I then tore a strip and placed on the centre of the blue bazzille sheet. I liked the look of the raw edges, then using the same gesso, and mist bottles I set about to blend this strip with the rest of the page.

Next I mounted the pics, and placed them on the page, I cut out from some Kaszazz paper I had in the stash some fun stars, words, arrows. These in place left only the title which I again found in my stash.

To complete the page I used black and white gel pens to do a little scribbling around the page. Thank you for dropping by, Sharon xxx

Thursday 13 August 2015

Life's Journey

Hi just sharing my layout for the challenge over at berry71bleu.blogspot.com/

The challenge was to use yellow in any quantity. Boy what to do I thought, so I mixed up some yellow acrylic paint in a mister bottler, and some black paint in a mister bottle. Using a white sheet of bazzill I sprayed the paints on the page.

Then I got out the builders mesh and placed one strip on the page. Using my modelling paste I have randomly applied it over the page and the builders mesh. A final touch up with the yellow mister bottle, then using my favourite mesh stamp and some Tim Holtz distress ink – mustard seed I stamped the mesh. Now the base is complete.

For my photo mat I used some yellow card stock, and using foil tape and a rivet embossing folder ran it through the big shot. I applied some white acrylic paint to the embossed foil sheet waited a moment or two for it to partly dry, then using paper towel I wiped most of the paint off. Then I stapled my photos and photo mats together and taped to the page.

I had the perfect vellum quote – “Life’s Journey”, then some metal charms and some brads, and a couple of hearts from the stash and I am done.

Thanks for dropping by, Sharon xxx

My guys

Hi there today I am sharing a layout of my boys, my three sons and nephew. I’ve been digging deep into my stash and starting to use up some items that have been there for well years. I’ve used gesso to mostly cover the pages, then using my distress stains in 3 colours I’ve covered the page.

The lovely pattern is a stamp, and I have used an overlay with the circles on to surround my photo mat. I cut the page down and adhered to a white sheet of bazzill. I wasn’t happy with the page so out came the washi tape.

I thought it looked like way to many circles with the overlay, so I cut out some yellow circles and used them as name tags. I really wanted the eyes to be drawn to the photo. Thanks for dropping by, Sharon xxx

Tuesday 11 August 2015

Togetherness

Today I am sharing my layout for the challenge over at http://wordspaintery.blogspot.com.au/. What beautiful colours to work with. Starting with a sheet of Kaszazz paper I have used my favourite shade of blue acrylic paint in a mister with water, and spraying lightly over the page to give a subtle hint of colour.

Then I used a mask and Glimmer Mist – turquoise blue, I sprayed the mask in two places, and not wanting to waste the glimmer mist of the mask, I turned it over and placed on the page, giving a reverse masked image.

I mixed up a darker blue acrylic paint with water in a mister, but quiet thick this time, and have sprayed some lines randomly around the page.

Using Fluid chalk ink – blue lagoon I have stamped the medallion stamp which is quite hard to see on the pic. Using Stampin Up – concord crush I stamped the feathers. Adding a little vellum for the letters and words and a lovely frame was all I thought needed to complete this layout.

The photo is of my sons (3), nephew and family friend. I am calling this layout Togetherness as to me that is what family is all about.

Thanks for dropping by, Sharon xxx

Sunday 9 August 2015

Family Photograph

Hi there this is my first time playing along over at http://scrapki-wyzwaniowo.blogspot.com.au/

The challenge was to use Typsetting (numbers or letters). Wow a hard challenge and it got me thinking, so I grabbed a sheet of Kaszazz paper with wording and pulled out the gesso, I covered mostly all of the page, but in some places you can see the wording showing through.

Then to try something new I pulled out my stampin up brayer, covered it with stampin up – chocolate chip, and started to roll away all over the page, I am quite happy with the colour.

I had the perfect printed vellum sheet so cut out the section I wanted to add to the bottom of my page. I matted the photos using corregated cardboard, and using some photo corners and brads I began placing my photos on the page.

Now for some background stamping, I used Distress ink – black soot for the letters which spell photograph., Then using distress ink - chipped sapphire I a lovely Kaszazz stamp set I have been waiting to try and I think it looks ok. To stamp the flowers from the same set I used stampin up – rich razzleberry.

This is a very simple layout and by adding a frame with the word family the layout is complete. Thanks for dropping by, Sharon xxx

Smile

Hi today I am sharing a layout for the challenge over at http://scrap-the-girls.blogspot.com.au What lovely colours to work with, starting with a really nice light pink sheet of bazzill I used gesso and some well lots of modelling paste for texture.

Using my favourite Smooch spritz – sup sugar I have misted randomly, then using a blue acrylic paint in a mister bottle I have lightly sprayed. Add a couple of splashes of Glimmer mist – mimosa and the background is done.

I have used some leftover pieces of Graphic 45 papers under my photo mat, then cut up some Kaiser paper and added for some journaling. The layout wouldn’t be complete without a paper doiley, some twine, a couple of handmade flowers, and some beautiful leaves.

As the photo is of me with my beautiful grand daughters Kirra and Khloe, who I love with all of my heart I added the little chipboard heart which I coloured with pen, then some glitter.

Thanks for dropping by, Sharon xxx

Friday 7 August 2015

Alyssa and Nikola First Day at new school

I wanted to scrap Alyssa and Nikola’s first day at the new school, so here is what I came up with. Starting with some gesso I painted the centre of the page. Now using a stencil and my favourite Smooch spritz’s – Emerald Green and Spun Sugar I misted over the stencil. I thought these colours blended well with the background.

I used up some leftover graphic 45 bits (the additions, ruler) and in the stash I found a vellum sheet with times tables on, so that was perfect. I stamped the letters using Distress Ink – Black Soot. Lastly to complete the page I added some rub ons.

The girls have settled well into their new school and I am very proud of them. Thanks for dropping by, Sharon xxx

Proud of my boys

Hi and what a lovely Saturday it is here, the perfect day to share another layout. This layout is for the Mood board challenge over at http://scraparoundtheworld.blogspot.com.au/

I started with a beautiful Kaszazz sheet of paper and using a large cog stencil I applied modelling paste. For something a little different I turned changed the placement of the stencil and turned it around. Using Smooch spritz – Spun sugar I misted my page. I thought this gave a nice effect on the page.

I used some corregated cardboard for my photo mat, and some leftover pieces of paper to back the photo mount. As I wanted this layout to be about the Love & Respect shown in the photos I cut letters from a vellum sheet to say “respect”. The “Love” word is from Kaisercraft which I had in my stash. I applied some black ink lightly so the colour matched the page.

Into the stash again and I found some lovely brads, charms, chipboard cogs, and of course the lovely chipboard motorbike which I coloured using different colour smooch.

To complete the layout I added some washi, as I figure if you have it you may as well use it right. Then looking at the completed layout I thought well why not write the words “Love & Respect”, “Strength”, “Unity” so I did inside the stencilled cogs. I thought this finished the layout perfectly.

Thank you for dropping bye, Sharon xxx

My boy Billy

Hello with the weekend fast approaching I got a little time this arvo to do a layout for the challenge over at http://scraptheboys.blogspot.com.au/

Starting with my base sheet from Print blocks – “metal texture” I applied gesso to cover most of the pattern. Then using glimmer mist – turquoise, and smooch spritz – black velvet I set about misting. I then stamped randomly using colorbox fluid ink – blackbird with a mesh strip.

I’ve used colorbox fluid ink – deep lagoon to stamp random splashes. Using stampin up – black which is very dark, I have used a lace strip stamp and applied mainly around the edges to fill in spots. Now I am new to this blogging so I may not be using the correct terms when telling what I have done but if you bear with me I will get better with practice.

I’ve used some cut outs from free magazine inserts including the picture frame, which go well with the background colours. I then completed my layout using the frames from my stash. Thanks for dropping by, Sharon xxx

Wednesday 5 August 2015

You are my Sunshine

.

Hi there today I am sharing my layout for the sketch challenge over at http://scrapafrica.blogspot.com.au/. What a beautiful sketch and colours to work with. The photo is of my sons Christopher, Wayne and Billy with my nephew Aubrey and best family friend Craig. These guys are my sunshine so this layout is made with pure LOVE.

Starting with my sheet of patterned paper I have applied gesso to mostly cover the entire page. A little subtle hint of the pattern can be seen. I have used Smooch Spritz – Green Olive and sprayed to draw attention to my photo.

I mounted my photo onto some beautiful papermania glitter paper from the paparazzi stack I had in my stash. I chose to go with circular photo and mount to match the sketch. Using some twine purchased from Kaszazz I have circled the photo 3 times and glued into position.

I made a tag (sort of a tag) to place beside my photo. I used some papers and made a collage, then I added gesso, and misted with Glimmer Mist – Gold, and Smooch Spritz – Green Olive. You can just slightly see the light bulb in the bottom corner from the collage. I used some builders mesh.

I coloured the chipboard mesh in the top corner with Smooch – lettuce. Added a few cut outs from a magazine freebie which I thought were perfect for this layout. Adding some paper flowers with brads for centres and some lovely material leaves completed the layout.

Thanks for dropping by, Sharon xxx

Monday 3 August 2015

Timeless Love

Hi today I sharing my layout for the challenge over at scrapbookitblog.blogspot.com

The challenge must include these M words...*Masculine* Memories* Mists.

So I had the perfect photos of my sons Christopher, Wayne and Billy, and my nephew Aubrey. Note to self I must get my photos professionally printed. Printing them yourself does not give the best quality photos.

Starting with my sheet of paper I have painted gesso to cover most of the page. Using Smooch Spritz – Black Velvet I have misted it over the page, then with a large amount of the smooch spritz on my finger I have wiped it over the page giving the rather solid black effect.

Now to mounting the photos, I’ve used some strips of paper from the paper leftover stash, including a strip of co-ordinates which I ran through the big shot with an embossing folder. I then used my Tim Holtz sanding block to give a lovely effect.

With my paper strips in place I have added my stamped clock faces, some kaisercraft brads again from my stash. These were the perfect addition to compliment the green embossed strip.

I added a metal clock charm, and tough times charm. A stamped Love in the corner and we are almost done. Now to add some pearls in the corners, and a lovely chipboard bike which I painted with Smooch pearlized accent ink.

A little journaling and we are almost done, I wanted to add a slight green tinge to the background so using my Sakura jelly roll pen in green, I have scribbled a little randomly around the page, and using a baby wipe I have smeared it ever so lightly. I think it completed the page nicely.

Thanks for dropping by, Sharon xxx
Happy Smile

Hi there my last blog post of the day, this is my layout for the challenge over at Scrap It With Attitude. The Challenge is to use at least 3 photos and washi tape.

What a great challenge and just perfect for these 3 pics of my son Wayne, and his children Kirra and Khloe. I have applied gesso to most of my base page, then using Smooch spritz – in colours Green and Emerald and Spun sugar I have misted lightly but quite heavily in some areas.

I decided not to mat the photos, and have used some lovely rub ons (trees and words). I used 3 different washi tapes only because I have them so may as well use them right. To finish my layout I used a black spiral strip rub on, but have just rubbed a little here and there. Thanks for stopping by. Sharon xx

Sunday 2 August 2015

Hanging with Great Grandma

Hi there this is my entry for the challenge over at Kraft Plus Challenges http://kraftpluschallenges.blogspot.com.au/

The challenge was to use Kraft card stock as the background and add ZENTANGLING to the creation. This being my first time doing any kind of Zentangling this is what I came up with.

Starting with my Kraft card stock as the base I mixed some Alcohol Ink – Stream (color) with gesso and painted a bit of a background round the photos. Then I added some blue acrylic paint to water in the spray bottle and lightly sprayed over the Kraft cardstock.

I added a strip of printed vellum – Simple pleasures are life’s greatest pleasures, I matted this onto part of the card from a Prima Flower packet. Now to add a little builders mesh randomly. I then fussy cut 4 flowers from a Kaisercraft - these were the perfect colour.

Now for the zentangle part – as you can see I so need to practice this, but I used a Sakura black pen and tried my best to zentangle. I added some blocks, some mesh and some leaves. I thought it best to not try adding anymore zentangle as I need to practice, so leaving it at that my layout is complete.

The photos are of my Mum with her Great Grand Daughters which are my Grand Daughters.

Thanks for stopping by, Sharon

Day at the Zoo

Hi there this is my entry for the Challenge over at White with 1

I started with a sheet of Bazzill in white, and using an acrylic block and my Tim Holtz – Mustard Seed, I covered the block and stamped my 3 solid shapes which go behind the photo. I then used Tim Holtz - Mustard Seed, Wild Honey, and Scattered Straw and again using the acrylic block I have lightly wiped this randomly around the page.

Using the same colours I have stamped the mesh patterns. The keys and clock face were stamped using Tim Holtz – Forest Moss. I have added my lettering and a lovely little rub on Giraffe, a couple of brads and a metal word.

I thought that the peg was ideal to place the Admit One ticket. To complete the layout I have used a yellow Tom Bow to draw some straight lines as borders but only randomly.

Thanks for dropping by, Sharon xx